Policies
DETAILS: Tier: Ultimate Offering: GitLab.com, Self-managed, GitLab Dedicated
Policies provide security and compliance teams with a way to enforce controls globally in their organization.
Security teams can ensure:
- Security scanners are enforced in development team pipelines with proper configuration.
- That all scan jobs execute without any changes or alterations.
- That proper approvals are provided on merge requests based on results from those findings.
Compliance teams can:
- Centrally enforce multiple approvers on all merge requests
- Enforce various settings on projects in scope of organizational requirements, such as enabling or locking merge request and repository settings.
The following policy types are available:
- Scan execution policy. Enforce security scans, either as part of the pipeline or on a specified schedule.
- Merge request approval policy. Enforce project-level settings and approval rules based on scan results.
Security policy project
A security policy project is a special type of project used only to contain policies. The
policies are stored in the .gitlab/security-policies/policy.yml YAML file.
To enforce the policies contained in an security policy project you link it to a project, subgroup, group, or multiples of each. A security policy project can contain multiple policies but they are enforced together. A security policy project enforced on a group or subgroup applies to everything below in the hierarchy, including all subgroups and their projects.
Policy changes made in a merge request take effect as soon as the merge request is merged. Those that do not go through a merge request, but instead are committed directly to the default branch, may require up to 10 minutes before the policy changes take effect.
Policy design guidelines
When designing your policies, your goals should be:
- Design policy enforcement for minimum overhead but maximum coverage
- Ensure separation of duties
Policy enforcement design
To maximize policy coverage, link a security policy project at the highest level that achieves your objectives: group level, subgroup level, or project level. Enforcement at the highest level minimizes the number of security policy projects and therefore the management overhead. Policies cascade down from each level to a project, such that policies may be enforced from the group level, each subgroup above it, and then for any policies created at the project level itself.
Policy inheritance of policies not only ensures maximum coverage with the minimum number of security policy projects, but also helps when implementing policy changes. For example, to test a policy change you could copy an existing policy and enforce the modified policy first to a project, then to a subgroup, and, if applicable, to a group.
NOTE: GitLab SaaS users may enforce policies against their top-level group or across subgroups, but cannot enforce policies across GitLab SaaS top-level groups. GitLab self-managed users can enforce policies across multiple top-level groups in their instance.
The following example illustrates two groups and their structure:
- Alpha group contains two subgroups, each of which contains multiple projects.
- Security and Compliance group contains two policies.
Alpha group (contains code projects)
-
Finance (subgroup)
- Project A
- Accounts receiving (subgroup)
- Project B
- Project C
-
Engineering (subgroup)
- Project K
- Project L
- Project M
Security and Compliance group (contains security policy projects)
- Security Policy Management
- Security Policy Management - security policy project
- SAST policy
- Secret Detection policy
Assuming no policies are enforced, consider the following examples:
- If the "SAST" policy is enforced at group Alpha, it applies to its subgroups, Finance and Engineering, and all their projects and subgroups. If the "Secret Detection" policy is enforced also at subgroup "Accounts receiving", both policies apply to projects B and C. However, only the "SAST" policy applies to project A.
- If the "SAST" policy is enforced at subgroup "Accounts receiving", it applies only to projects B and C. No policy applies to project A.
- If the "Secret Detection" is enforced at project K, it applies only to project K. No other subgroups or projects have a policy apply to them.
Separation of duties
Separation of duties is vital to successfully implementing policies. Security and compliance teams should be responsible for defining policies and working with development teams. Development teams should not be able to disable, modify, or circumvent the policies, in any way, or for any exceptions. Implement policies that achieve the necessary compliance and security requirements, while allowing development teams to achieve their goals.
By default, to enforce a security policy project on a group, subgroup, or project, you must have the Owner role at the same hierarchy level.
| Organization unit | Group owner | Subgroup owner | Project owner |
|---|---|---|---|
| Group | {check-circle} Yes | {dotted-circle} No | {dotted-circle} No |
| Subgroup | {check-circle} Yes | {check-circle} Yes | {dotted-circle} No |
| Project | {check-circle} Yes | {check-circle} Yes | {check-circle} Yes |
Optionally, you can create a custom role with the manage_security_policy_link permission. For more
information, see Custom roles.
Policy implementation
Implementation options for security policy projects differ slightly between GitLab.com, GitLab Dedicated, and GitLab self-managed. The main difference is that on GitLab.com it's only possible to create subgroups. Ensuring separation of duties requires more granular permission configuration.
Enforce policies globally in your GitLab.com namespace
DETAILS: Tier: Ultimate Offering: GitLab.com
Prerequisites:
- You must have the Owner role with proper permissions to link to the security policy project. For more information, see separation of duties.
The high-level workflow for enforcing policies globally across all subgroups and projects in your GitLab.com namespace:
-
Visit the Policies tab from your top-level group.
-
In the subgroup, go to the Policies tab and create a test policy.
(Tip: You can create a policy as disabled for testing.) Creating the policy automatically creates a new security policy project under your top-level group. This project is used to store your
policy.ymlor policy-as-code. -
Check and set permissions in the newly created project as desired.
By default, Owners and Maintainers are able to create, edit, and delete policies. Developers can propose policy changes but cannot merge them.
-
In the security policy project created within your subgroup, create the policies required.
You can use the policy editor in the
Security Policy Managementproject you created, under the Policies tab. Or you can directly update the policies in thepolicy.ymlfile stored in the newly-created security policy projectSecurity Policy Management - security policy project. -
Link up groups, subgroups, or projects to the security policy project.
As a subgroup owner, or project owner with proper permissions, you can visit the Policies page and create a link to the security policy project. Include the full path and the project's name should end with "- security policy project". All linked groups, subgroups, and projects become "enforceable" by any policies created in the security policy project. For details, see Link to a security policy project.
-
By default, when a policy is enabled, it is enforced on all projects in linked groups, subgroups, and projects.
For more granular enforcement, add a "policy scope". Policy scopes allow you to enforce policies against a specific set of projects or against projects containing a given set of compliance framework labels.
-
If you need additional restrictions, for example to block inherited permissions or require additional review or approval of policy changes, you can create an additional policy scoped only to your security policy project and enforce additional approvals.
Enforce policies globally in GitLab Dedicated or your GitLab self-managed instance
DETAILS: Tier: Ultimate Offering: Self-managed, GitLab Dedicated
Prerequisites:
- You must have the Owner role (with proper permissions) to link to the security policy project. For more information, see separation of duties.
- To support approval groups globally across your instance, enable
security_policy_global_group_approvers_enabledin your GitLab instance application settings.
The high-level workflow for enforcing policies across multiple groups:
-
Create a separate group to contain your policies and ensure separation of duties.
By creating a separate standalone group, you can minimize the number of users who inherit permissions.
-
In the new group, visit the Policies tab.
This serves as the primary location of the policy editor, allowing you to create and manage policies in the UI.
-
Create a test policy (you can create a policy as disabled for testing).
Creating the policy automatically creates a new security policy project under your group. This project is used to store your
policy.ymlor policy-as-code. -
Check and set permissions in the newly created project as desired.
By default, Owners and Maintainers are able to create, edit, and delete policies. Developers can propose policy changes but cannot merge them.
-
In the security policy project created in your subgroup, create the policies required.
You can use the policy editor in the
Security Policy Managementproject you created, under the Policies tab. Or you can directly update the policies in thepolicy.ymlfile stored in the newly-created security policy projectSecurity Policy Management - security policy project. -
Link up groups, subgroups, or projects to the security policy project.
As a subgroup owner, or project owner with proper permissions, you can visit the Policies page and create a link to the security policy project. Include the full path and the project's name should end with "-security policy project". All linked groups, subgroups, and projects become "enforceable" by any policies created in the security policy project. For more information, see link to a security policy project.
-
By default, when a policy is enabled, it is enforced on all projects in linked groups, subgroups, and projects. For more granular enforcement, add a policy scope. Policy scopes allow you to enforce policies against a specific set of projects or against projects containing a given set of compliance framework labels.
-
If you need additional restrictions, for example to block inherited permissions or require additional review or approval of policy changes, you can create an additional policy scoped only to your security policy project and enforce additional approvals.
Link to a security policy project
To enforce the policies contained in a security policy project against a group, subgroup, or project, you link them. By default, all linked entities are enforced. To enforce policies granularly per policy, you can set a "policy scope" in each policy.
Prerequisites:
- You must have the Owner role (with proper permissions) to link to the security policy project. For more information, see separation of duties.
To link a group, subgroup, or project to a security policy project:
- On the left sidebar, select Search or go to and find your project, subgroup, or group.
- Select Secure > Policies.
- Select Edit Policy Project, then search for and select the project you would like to link from the dropdown list.
- Select Save.
To unlink a security policy project, follow the same steps but instead select the trash can icon in the dialog.
Viewing the linked security policy project
All users who have access to the project policy page and are not project owners instead view a button linking out to the associated security policy project.
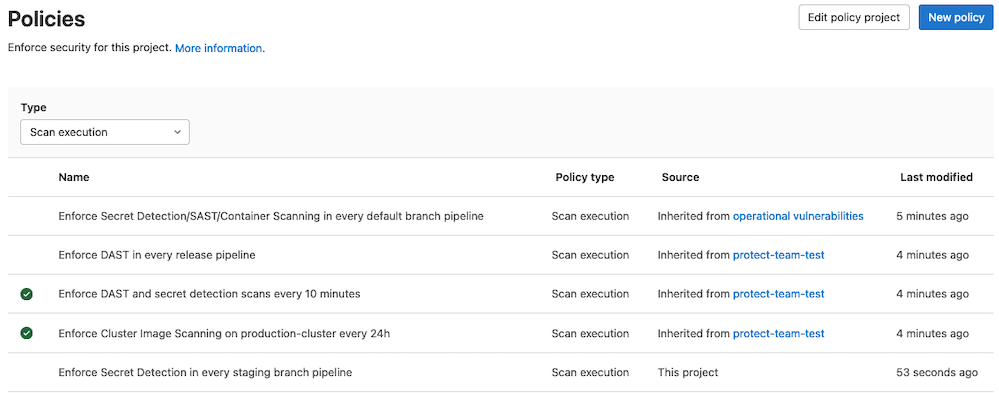
Policy management
The Policies page displays deployed policies for all available environments. You can check a policy's information (for example, description or enforcement status), and create and edit deployed policies:
- On the left sidebar, select Search or go to and find your project.
- Select Secure > Policies.
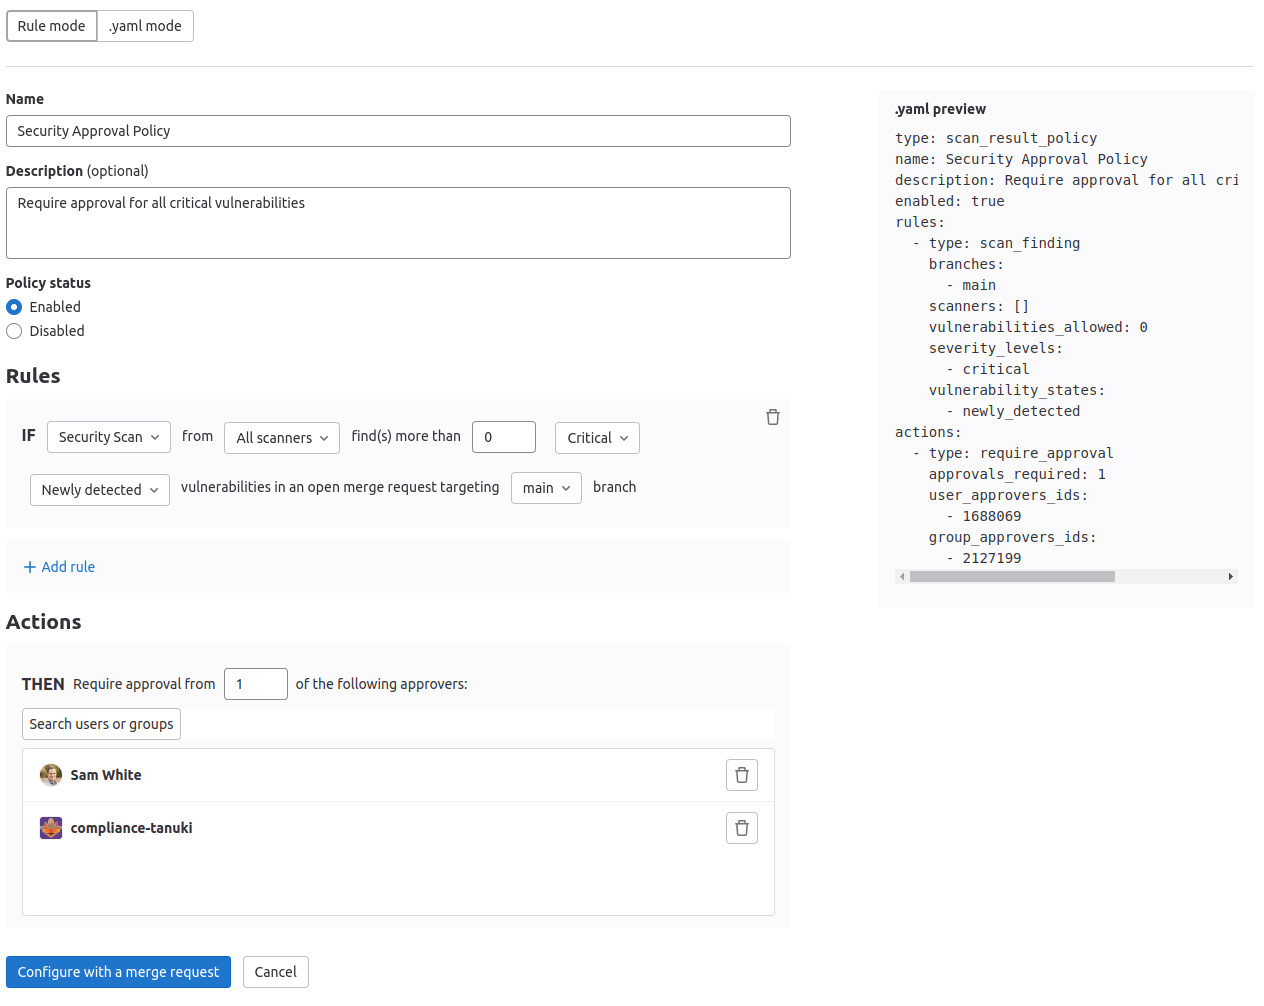
Policy editor
Use the policy editor to create, edit, and delete policies:
-
On the left sidebar, select Search or go to and find your project.
-
Select Secure > Policies.
- To create a new policy, select New policy which is located in the Policies page's header. You can then select which type of policy to create.
- To edit an existing policy, select Edit policy in the selected policy drawer.
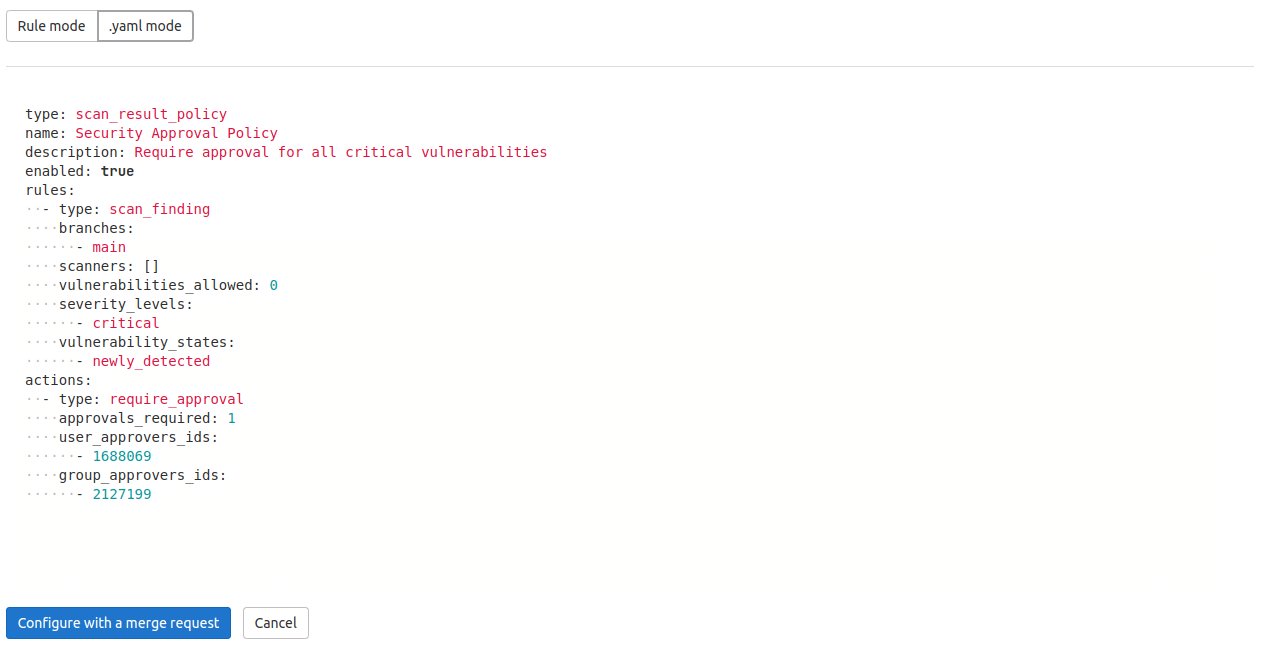
The policy editor has two modes:
-
The visual Rule mode allows you to construct and preview policy rules using rule blocks and related controls.

-
YAML mode allows you to enter a policy definition in
.yamlformat and is aimed at expert users and cases that the Rule mode doesn't support.You can use both modes interchangeably and switch between them at any time. If a YAML resource is incorrect or contains data not supported by the Rule mode, Rule mode is automatically disabled. If the YAML is incorrect, you must use YAML mode to fix your policy before Rule mode is available again.
-
Select Configure with a merge request to save and apply the changes.
The policy's YAML is validated and any resulting errors are displayed.
-
Review and merge the resulting merge request.
If you are a project owner and a security policy project is not associated with this project, a security policy project is created and linked to this project when the merge request is created.
Managing projects in bulk by using a script
You can use the Vulnerability-Check Migration script to bulk create policies or associate security policy projects with development projects. For instructions and a demonstration of how to use the Vulnerability-Check Migration script, see Migration from Vulnerability-Check rules to Scan Result Policies with automated script.
Troubleshooting
Branch name 'update-policy-<timestamp>' does not follow the pattern '<branch_name_regex>'
When you create a new security policy or change an existing policy, a new branch is automatically
created with the branch name following the pattern update-policy-<timestamp>. For example:
update-policy-1659094451.
If you have group or instance push rules that do not allow branch name patterns that contain the text update-policy-<timestamp>, you will get an error that states Branch name 'update-policy-<timestamp>' does not follow the pattern '<branch_name_regex>'.
The workaround is to amend your group or instance push rules to allow branches following the pattern update-policy- followed by an integer timestamp.
Troubleshooting common security policy issues
- Confirm that scanners are properly configured and producing results for the latest branch. Security Policies are designed to require approval when there are no results (no security report), as this ensures that no vulnerabilities are introduced. We cannot know if there are any vulnerabilities unless the scans enforced by the policy complete successfully and are evaluated.
- For merge request approval policies, we require artifacts for each scanner defined in the policy
for both the source and target branch. To ensure merge request approval policies capture the
necessary results, confirm your scan execution is properly implemented and enforced. If using scan
execution policies, enforcing on
all branchesoften addresses this need. - Comparison in merge request approval policies depends on a successful and completed merge base pipeline. If the merge base pipeline is skipped, merge requests with the merge base pipeline are blocked.
- When running scan execution policies based on a SAST action, ensure target repositories contain proper code files. SAST runs different analyzers based on the types of files in the repository, and if no supported files are found it does not run any jobs. See the SAST CI template for more details.
- Check for any branch configuration conflicts. For example, if your policy is configured to enforce
rules on
mainbut some projects in the scope are usingmasteras their default branch, the policy is not applied for the latter. You can define policies to enforce rules generically ondefaultbranches regardless of the name used in the project or onall protected branchesto address this issue. - Merge request approval policies created at the group or subgroup level can take some time to apply to all the merge requests in the group.
- Scheduled scan execution policies run with a minimum 15 minute cadence. Learn more about the schedule rule type.
- When scheduling pipelines, keep in mind that CRON scheduling is based on UTC on GitLab SaaS and is based on your server time for self managed instances. When testing new policies, it may appear pipelines are not running properly when in fact they are scheduled in your server's time zone.
- When enforcing scan execution policies, security policies use a bot in the target project to trigger scheduled pipelines to ensure enforcement. When the bot is missing, it is automatically created, and the following scheduled scan uses it.
- You should not link a security policy project to both a development project and the group or subgroup the development project belongs to. Linking this way results in approval rules from the merge request approval policies not being applied to merge requests in the development project.
- When creating a merge request approval policy, neither the array
severity_levelsnor the arrayvulnerability_statesin thescan_findingrule can be left empty. For a working rule, at least one entry must exist. - When merge request approval policies are enforced on projects containing manual jobs in their pipeline, policies evaluate the completed pipeline jobs and ignore the manual jobs. When the manual jobs are run, the policy re-evaluates the MR.
If you are still experiencing issues, you can view recent reported bugs and raise new unreported issues.